Deploy with Existing Vineyard Cluster#
If you have already deployed a vineyard cluster, you can easily deploy GraphScope on the existing cluster and reuse the vineyard data such as graph with several GraphScope sessions. This will allow you to load a graph to the existing vineyard cluster and then reuse it with multiple GraphScope sessions, without the need to deploy a separate vineyard cluster for each session

Create a default GraphScope session#
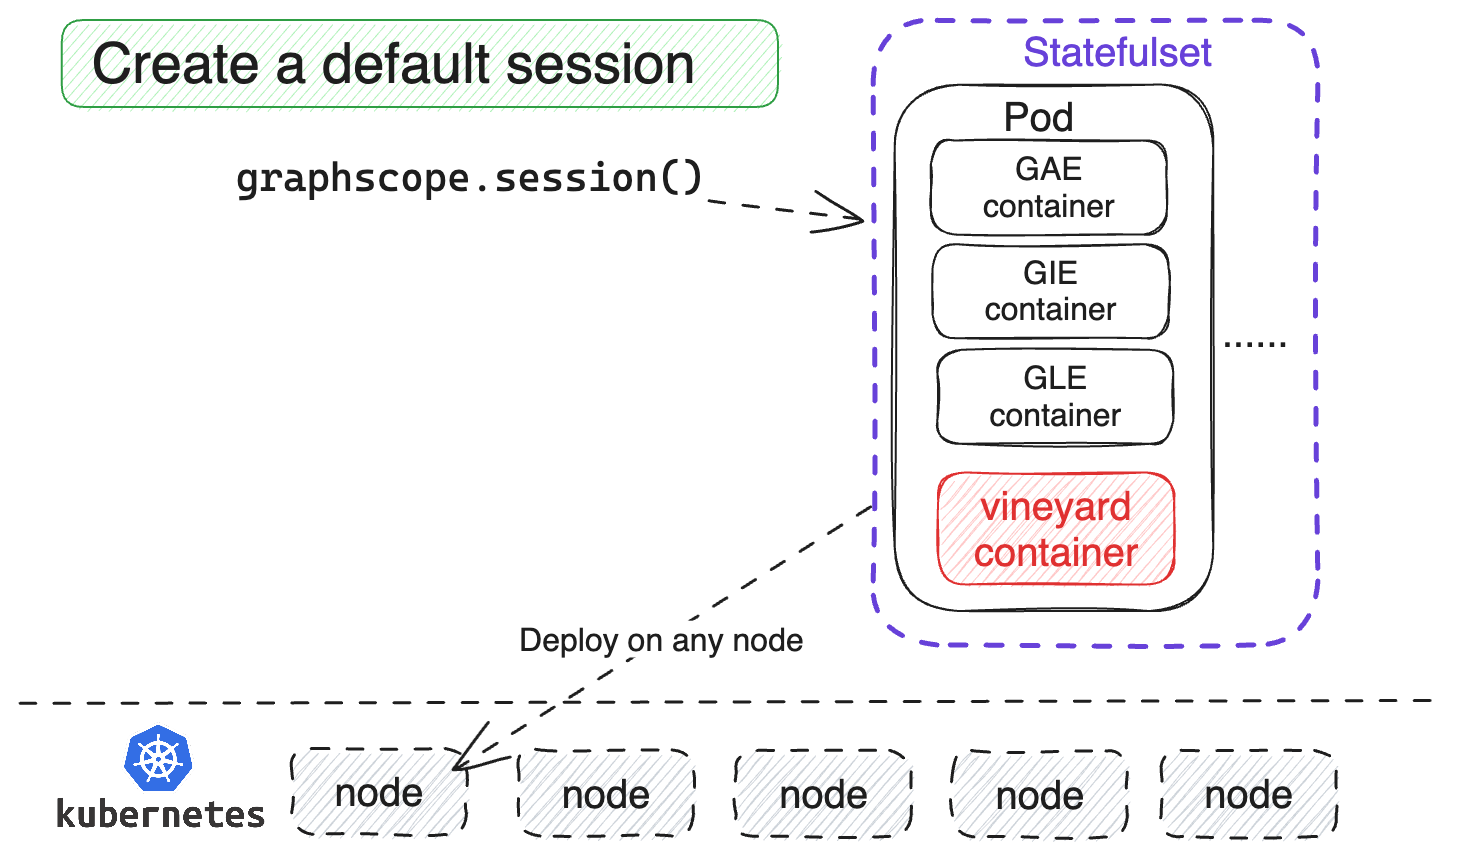
If you create a default GraphScope session, all engines including Vineyard are bundled in the same pod, so that they can be deployed on any node within the Kubernetes cluster. However, this creates a closed Vineyard cluster, which is only accessible to the GraphScope session. When the session is closed, the Vineyard cluster is also deleted, and it cannot be accessed by other GraphScope sessions.

Connecting GraphScope sessions to an existing vineyard cluster for data sharing#
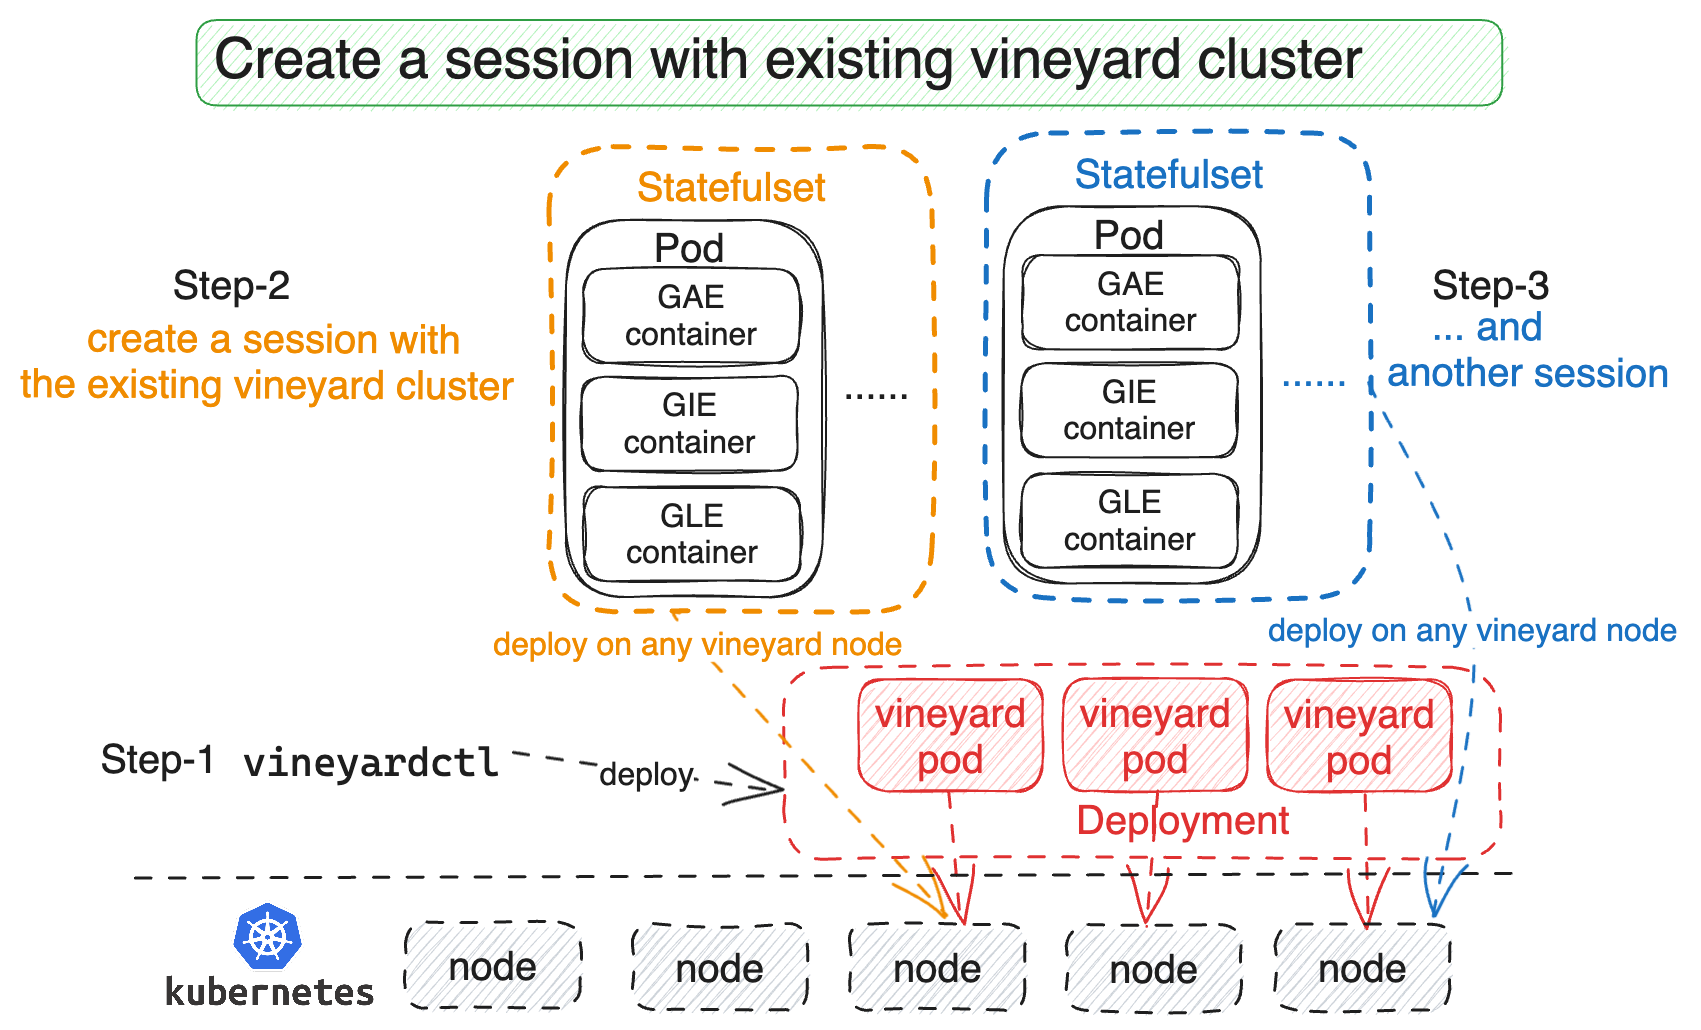
The figure above shows that GraphScope sessions can share the data in the same vineyard cluster as the engines in different sessions are deployed on the same node within the Kubernetes cluster and connected to the same vineyard socket. Multiple sessions can reuse the same graph as long as the vineyard cluster is alive. This is a common use pattern of vineyard on Kubernetes.
If you don’t want to reserve the vineyard cluster for a long time, you can store the graphs in the vineyard cluster in the persistent storage, and then load the data from the persistent storage to the vineyard cluster when you need it. For more details, please refer to Persistent storage of graphs on the Kubernetes cluster.
Next provides step-by-step instructions on how to do this.
Prerequisites#
Before you begin, make sure you have the following:
Linux or macOS.
Python 3.7 ~ 3.11.
Install GraphScope Client#
The deployment of GraphScope is managed by python API, please make sure you have already installed the GraphScope python package.
python3 -m pip install graphscope-client
Refer to Install GraphScope Client for details.
Prepare a Kubernetes cluster#
If you don’t have a Kubernetes cluster by hand, we recommend using minikube.
Please refer to Prepare a Kubernetes cluster for details.
Deploy a Vineyard Cluster#
To simplify the deployment of vineyard cluster, you need to install the vineyard package.
python3 -m pip install vineyard
By default, the Vineyard cluster consists of three Vineyard instances and three etcd instances.
However, since we only have one node in the Kubernetes cluster, we need to specify the number of Vineyard instances and etcd instances using the replicas and etcd_replicas parameters. DON’T set the number of Vineyard instances and etcd instances to be greater than the number of nodes in the Kubernetes cluster. Instead, the number of vineyard replicas and the number of engine pods can be set independently.
Create and check the namespace vineyard-system as follows.
$ kubectl create namespace vineyard-system
namespace/vineyard-system created
$ kubectl get namespace vineyard-system
NAME              STATUS   AGE
vineyard-system   Active   33s
To deploy a simple Vineyard cluster with one Vineyard instance and one etcd instance, follow the next step:
import vineyard

# The default deployment name is `vineyardd-sample` and the default namespace is `vineyard-system`. Also, you can specify the deployment name and namespace by `name` parameter and `namespace` parameter. For more details about the parameters, please refer to the doc of vineyardctl
# https://github.com/v6d-io/v6d/blob/main/k8s/cmd/README.md
# Notice, all character `-` in the parameter of vineyardctl should be replaced with `_` in the python API
vineyard.deploy.vineyardctl.deploy.vineyard_deployment(
    replicas=1,
)
Then you can get a vineyard cluster with one vineyard instance and one etcd instance in the namespace vineyard-system.
Check all vineyard pods as follows.
$ kubectl get pod -n vineyard-system
NAME                               READY   STATUS    RESTARTS   AGE
etcd0                              1/1     Running   0          73m
vineyardd-sample-5db59987f-vr2fg   1/1     Running   0          73m
The lifecycle of a vineyard cluster#
If you deploy the vineyard cluster with the vineyardctl API, it will persist until you manually delete it. The vineyard cluster will not be affected by quitting the GraphScope session. You can delete the vineyard cluster with the following command:
import vineyard
vineyard.deploy.vineyardctl.delete.vineyard_deployment()
However, if you do not deploy the vineyard cluster beforehand, it will be created when you create a GraphScope session with the specified vineyard deployment name and namespace. The vineyard cluster will be deleted when you close the GraphScope session.
Load the dataset to the Kubernetes cluster#
Depending on how the Kubernetes cluster was created, you may need to take different steps to make your dataset available within the cluster. If the cluster was not created using minikube, you will need to either copy the dataset to the nodes of the Kubernetes cluster or mount it onto them. On the other hand, if the cluster was created using minikube, you can directly mount the dataset to the minikube VM, without the need for further copying or mounting operations.
Download the dataset to the local machine.
$ git clone https://github.com/GraphScope/gstest.git
Then mount the dataset to the minikube VM.
Tip
The mount process must stay alive for the mount to be accessible. Please don’t stop the mount process until the graph is loaded to the vineyard cluster.
$ minikube mount $(pwd)/gstest:/testingdata
Load a graph to the existing vineyard cluster#
You can create a GraphScope session and then specify the k8s_namespace and k8s_vineyard_deployment to which vineyard cluster you want to connect. Then load a graph to the existing vineyard cluster as follows. Once the graph is loaded, you can obtain its vineyard ID to reload it with another GraphScope session.
import os
import graphscope
from graphscope.dataset import load_modern_graph

k8s_volumes = {
    "data": {
        "type": "hostPath",
        "field": {
            "path": "/testingdata",
            "type": "Directory"
        },
        "mounts": {
        "mountPath": "/testingdata"
        }
    }
}

# the step will be long as it will create a graphscope cluster
# Make sure the vineyard cluster is created before creating the GraphScope session
# if it's not exist, a new vineyard cluster will be created and the graph will be loaded to the new vineyard cluster
sess = graphscope.session(
    k8s_namespace='vineyard-system',
    k8s_vineyard_deployment='vineyardd-sample',
    k8s_volumes=k8s_volumes
)

# load a graph to the vineyard cluster
graph = load_modern_graph(sess, "/testingdata/modern_graph")

# print the vineyard id of the graph
print(graph.vineyard_id)
Connect to the existing vineyard cluster with another GraphScope session#
Create a new GraphScope session and specify the k8s_namespace and k8s_vineyard_deployment to the vineyard
cluster the last GraphScope session connected to. Also, you need to remember the vineyard id of the graph and
then load the graph with the vineyard id in the new GraphScope session.
import graphscope
import vineyard

# the step will be long as it will create a graphscope cluster
new_sess = graphscope.session(
    k8s_namespace='vineyard-system',
    k8s_vineyard_deployment='vineyardd-sample',
)

# Use the vineyard id of the graph the last GraphScope session loaded
# assume the vineyard id is 22731319746904674, you can load it as follows
graph = new_sess.load_from(vineyard.ObjectID(22731319746904674))
Check the graph as follows.
>> graph

graphscope.Graph
ARROW_PROPERTY
VERTEX: person
VERTEX: software
EDGE: knows     src: person     dst: person
EDGE: created   src: person     dst: software
If you see the output above, that means you have successfully reused the existing graph within the vineyard cluster using a new GraphScope session. Then you can run various graph algorithms on it.
Cleaning up#
Delete the Vineyard cluster by
# the default vineyard deployment name is `vineyardd-sample` and namespace is `vineyard-system`, if you don't specify the arguments when you create the vineyard cluster, you can delete it as follows
vineyard.deploy.vineyardctl.delete.vineyard_deployment()
Delete the GraphScope cluster by
sess.close()
new_sess.close()
Delete the kubernetes cluster created by the minikube as follows.
minikube delete