How to Run GraphScope on Kubernetes Cluster
 This article will provide a detailed introduction on how to deploy GraphScope on a Kubernetes cluster. In real industrial scenarios, the scale of graph data that needs to be processed is huge and has far exceeded the processing capacity of a single machine. Therefore, in addition to the single-machine deployment method, GraphScope also supports running on a Kubernetes cluster with the distributed memory data management capability provided by vineyard. It will cover the following topics: 1) How to deploy GraphScope based on a Kubernetes cluster; 2) The details of the work behind it; 3) How to use your own built GraphScope development image in a distributed environment.
Prerequisites
- A Kubernetes cluster, which could be a Kubernetes cluster provided by cloud vendor, or a tool that could simulating a cluster such as kind/minikube.
- kubectl for interacting with kubernetes cluster
- Python3 environment for graphscope client
- Docker Only if you choose to setup a local cluster
This article uses Kind as an example to introduce how to build a virtual Kubernetes cluster on a local machine and deploy GraphScope upon that. If you want to build a real multi-node cluster, you can refer to the kubeadm documentation; If you don’t want to manually manage a Kubernetes cluster, you can also choose a well-known cloud vendor product, such as Aliyun ACK, AWS EKS, etc.
Assuming you have kind installed in your machine, bootstrap a virtual cluster by the following command
$ kind create cluster
You can also use the script provided by GraphScope to install the required dependencies and initialize the virtual cluster at once
$ wget -O - https://raw.githubusercontent.com/alibaba/GraphScope/main/scripts/install_deps.sh | bash -s -- --k8s
The script’s will install the necessary dependencies and attempt to launch a Kubernetes cluster through Kind. If you choose not to use Kind, you can also use other community-supported tools to build a Kubernetes cluster. After launching the local virtual cluster, we can run the following command to check if the Kubernetes configuration is correct:
$ kubectl get nodes

NAME    STATUS   ROLES    AGE    VERSION
node1    Ready    <none>   5d9h   v1.22.3-aliyun.1
Then, install the GraphScope Python client by
pip3 install graphscope
Deploying the cluster through Python
GraphScope distribute artifacts as docker images. By default, if the machine running GraphScope does not have a corresponding image, it will pull the latest version of image. Therefore, please ensure that your cluster can access the public image repository.
Session serves as the entry point for GraphScope on the client side. It manages a set of resources behind GraphScope and allows users to interact with various engines of GraphScope running on this set of resources.
Next, we can create a GraphScope instance with two worker nodes on the Kubernetes cluster.
>>> import graphscope
>>> sess = graphscope.session(num_workers=2)
>>> print(sess)
{'status': 'active', 'type': 'k8s', 'engine_hosts': 'gs-engine-jlspyc-6k8j7,gs-engine-jlspyc-mlnvb', 'namespace': 'gs-xxwczb', 'session_id': 'session_narhaktn', 'num_workers': 2}
The first deployment may take some time to pull the image. After the deployment is successful, we can see the current status of the sess and the namespace to which this instance belongs.
In the command line window, we can use the kubectl get to view the components launched by the current GraphScope instance.
# Check pods
$ kubectl -n gs-xxwczb get pod
NAME                                  READY   STATUS    RESTARTS   AGE
coordinator-jlspyc-6d6fd7f747-9sr7x   1/1     Running   0          8m27s
gs-engine-jlspyc-6k8j7                2/2     Running   0          8m23s
gs-engine-jlspyc-mlnvb                2/2     Running   0          8m23s
gs-etcd-jlspyc-0                      1/1     Running   0          8m24s

# Check service
$ kubectl -n gs-xxwczb get service
NAME                         TYPE        CLUSTER-IP       EXTERNAL-IP   PORT(S)               AGE
coordinator-service-jlspyc   NodePort    172.16.137.185   <none>        59050:32277/TCP       8m55s
gs-etcd-jlspyc-0             ClusterIP   172.16.208.134   <none>        57534/TCP,58955/TCP   8m51s
gs-etcd-service-jlspyc       ClusterIP   172.16.248.69    <none>        58955/TCP             8m52s
The process of starting each component by Session is as follows:
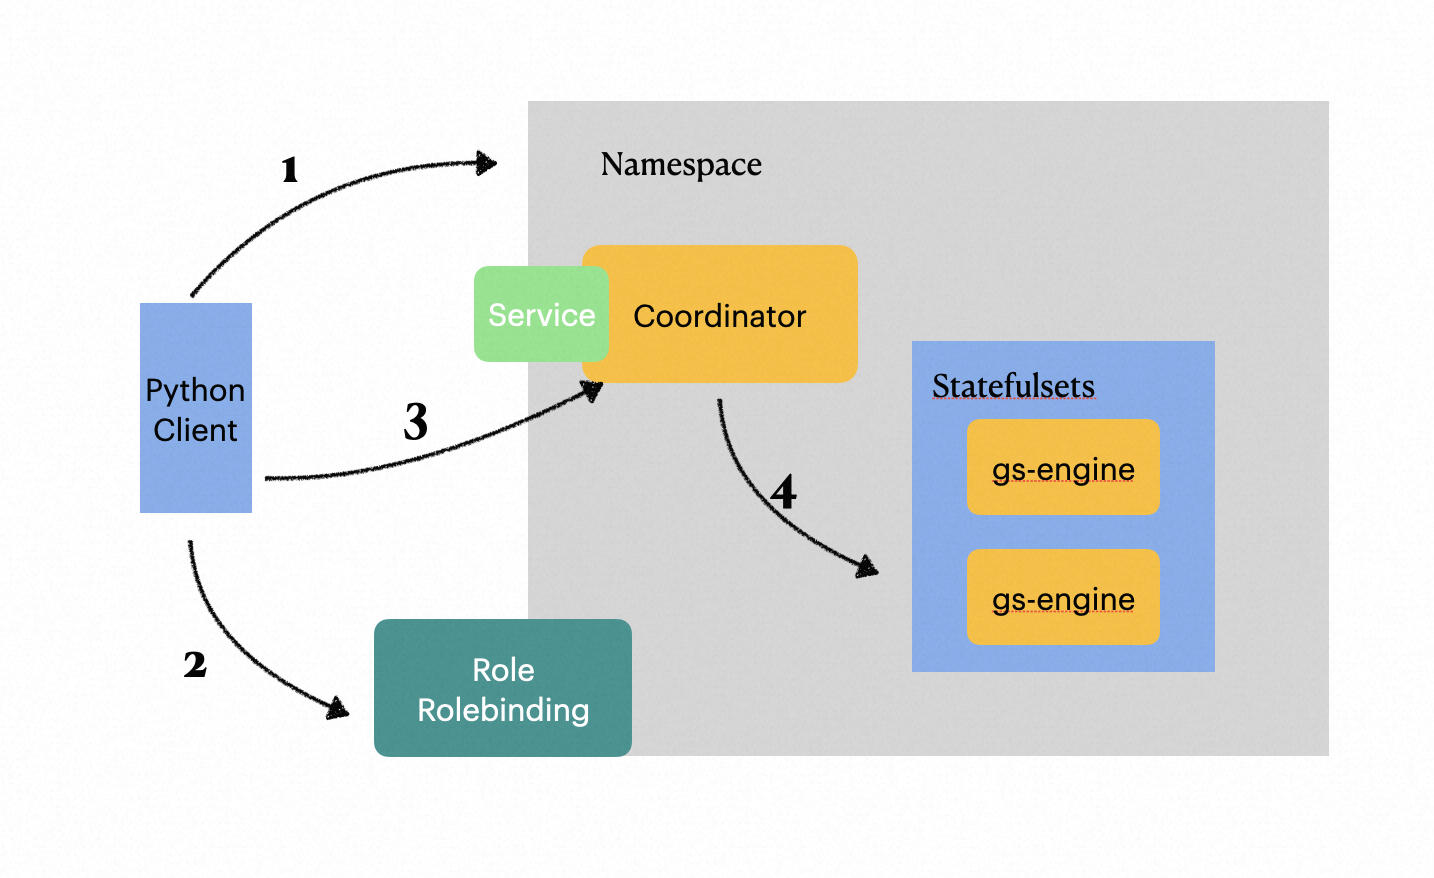
As shown in the above figure, behind this statement sess = graphscope.session(num_workers=2), GraphScope would launch each component in the following process:
- By default, when creating a session, this method creates a separate namespace for each Kubernetes object used later, including
Pod,Role, etc. When the user closes the session, the entire namespace will be deleted. - After the namespace is created, the subsequent startup process is proceeded through the Kubernetes API using the default service account. Since the default service account does not have permission to read
Pods, we create aRolethat can operate onPodandDeployment,Statefulsetsobjects in the corresponding namespace using RBAC API after creating a namespace on the client side, then bind it to the default service account. This allows containers created by GraphScope to access other kubernetes objects in their respective namespaces. - The client will launch Coordinator as the entry point of GraphScope backend service. It would communicates with client through GRPC and manages the lifecycle of Graph Analysis Engine (GAE), Graph Interactive Engine (GIE), and Graph Learning Engine (GLE).
- Coordinator Pod will launch server-side components in the current namespace according to session parameters passed by client — a
Statefulsetswith graph computing engines and Vineyard containers. - Finally, GraphScope Coordinator uses Kubernetes Service to expose services to external applications (in this case, the client). Currently, we support NodePort and LoadBalancer as service types. For specific configuration details, please refer to parameter details below.
Session parameters
Session can accept a set of parameters to customize the configuration of the cluster. For example, the num_workers parameter can define number of workers to be launched, and the timeout_seconds parameter defines the timeout time for creating the cluster. The meanings and default values of some commonly used parameters are as follows. For details of all parameters, please refer to the documentation.
| Parameters | Description | Default Value |
|---|---|---|
| addr | To connect to a existing GraphScope cluster. Commonly used with helm deployment | None |
| k8s_namespace | Specify the namespace. If exists, deploy GraphScope within that namespace. Else create a new namespace | None |
| k8s_image_registry | The registry of GraphScope images | registry.cn-hongkong.aliyuncs.com |
| k8s_image_tag | The tag of GraphScope images | 0.22.0 (the version of the client) |
| k8s_image_pull_policy | The image pull policy, one of IfNotPresent and Always |
IfNotPresent |
| k8s_service_type | How to expose service. one of NodePort and LoadBalancer |
NodePort |
| num_workers | The number of GraphScope engine workers | 2 |
| show_log | Where output detailed log on client | False |
| log_level | The log level, could be DEBUG and INFO |
INFO |
| timeout_seconds | The timeout duration when creating GraphScope cluster | 600 |
Among the above parameters, k8s_service_type is usually the one that needs attention. You can choose the appropriate service type according to the following introduction:
-
NodePorttype is the most simple way to import external traffic into Kubernetes services. As its name suggests, it opens a specific port (range 30000 ~ 32767) on the corresponding Kubernetes node. Any traffic sent to this port will be forwarded to the corresponding service (that is, the Coordinator service in GraphScope). Therefore, if you useNodePorttype, please make sure that the machine where the Python client is located can communicate with the Kubernetes cluster node. -
LoadBalancertype is the standard way to expose services to the Internet. However, currently deployed Kubernetes clusters usually do not have LoadBalancer capabilities by default. You need to deploy it manually,. In addition, certified platforms such as Aliyun ACK or AWS EKS usually directly provide LoadBalancer capabilities.
Develop and build custom images
While GraphScope provides docker images associated with every release, you could also build a custom image from the source code.
$ git clone https://github.com/alibaba/GraphScope.git && cd GraphScope/k8s
# Build images for all components, including analytical, interactive, learning and coordinator
$ make all
# or if you want to build a image for a specific component
$ make analytical
The command will produce the corresponding image, which could be used by specifying parameters in Session. Assuming the image are named graphscope/analytical:latest, which means
the registry is empty or docker.io, and the tag is latest.
>>> import graphscope
>>> sess = graphscope.session(k8s_image_registry="", k8s_image_tag="latest")
Conclusion
As a graph computing engine that can efficiently process ultra-large-scale data in cloud-native environments, this article focuses on how to deploy GraphScope based on Kubernetes environments. At the same time, this article also details the details behind the deployment of GraphScope on Kubernetes. In addition, GraphScope also supports deployment in the form of Helm, which allows clients to connect to a deployed service. We will also detail this part in subsequent articles. Finally, we sincerely welcome everyone to use GraphScope and provide feedback on any issues encountered.